Hey everyone!
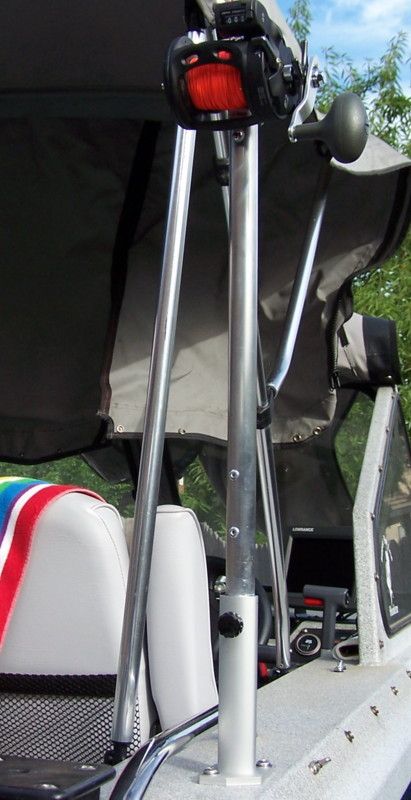
This is my first post and I wanted to share the downrigger I just put on the boat. I wanted to get into Kokanee fishing but did not want to spend tons of money on something i've never tried. So I started looking at downriggers and decided, I can do that!. I used an L bracket from the pipe fitting section at lowes, A piece of 3/4 inch rigid emt I got off my dad (he's an electrician) and two minis (pipe connectors) from him as well. I bought an old pen 65 reel from ebay for 15 bucks including shipping and a cannon mini downrigger boom end and pulley for 13. In retrospect I should have got a mini pulley and had my buddy weld the pieces together so they do not swivel, you can get them off amazon for 5 bucks or so. Ah well, still works. I connected the L bracket to the oar lock holder. Next week we will be using metal plumbing straps and 550 cord to make the pulley more permanent and a mini U-bold to keep the reel in place as well as using PVC to mount a rod holder. Also we will be modifying the reel so we can use a battery drill to bring the weight up. I'll be using a 6 lb cannon ball and 100 lb braided test. I have a Okuma reel with a depth counter so I know how deep ill be. I think I spent around 30 bucks so far. LMK what you guys think!
This is my first post and I wanted to share the downrigger I just put on the boat. I wanted to get into Kokanee fishing but did not want to spend tons of money on something i've never tried. So I started looking at downriggers and decided, I can do that!. I used an L bracket from the pipe fitting section at lowes, A piece of 3/4 inch rigid emt I got off my dad (he's an electrician) and two minis (pipe connectors) from him as well. I bought an old pen 65 reel from ebay for 15 bucks including shipping and a cannon mini downrigger boom end and pulley for 13. In retrospect I should have got a mini pulley and had my buddy weld the pieces together so they do not swivel, you can get them off amazon for 5 bucks or so. Ah well, still works. I connected the L bracket to the oar lock holder. Next week we will be using metal plumbing straps and 550 cord to make the pulley more permanent and a mini U-bold to keep the reel in place as well as using PVC to mount a rod holder. Also we will be modifying the reel so we can use a battery drill to bring the weight up. I'll be using a 6 lb cannon ball and 100 lb braided test. I have a Okuma reel with a depth counter so I know how deep ill be. I think I spent around 30 bucks so far. LMK what you guys think!


